
Cloudflare Workers 搭建 Docker Hub镜像加速服务
编辑
1696
2024-08-27
简介
基于Cloudflare Workers 搭建 Docker Hub镜像加速服务。
首先要注册一个Cloudflare账号。
Cloudflare账号下域名的一级域名,推荐万网注册个top域名,再转移到Cloudflare,很便宜的。
注意 Worker 每天每免费账号有次数限制,为10万次。每分钟为1000次。
步骤
登录到CF的仪表盘 https://dash.cloudflare.com/
点击 Workers 和 Pages > 创建应用程序 > 创建 Worker > 点击保存 >点击完成 > 编辑代码
编辑代码
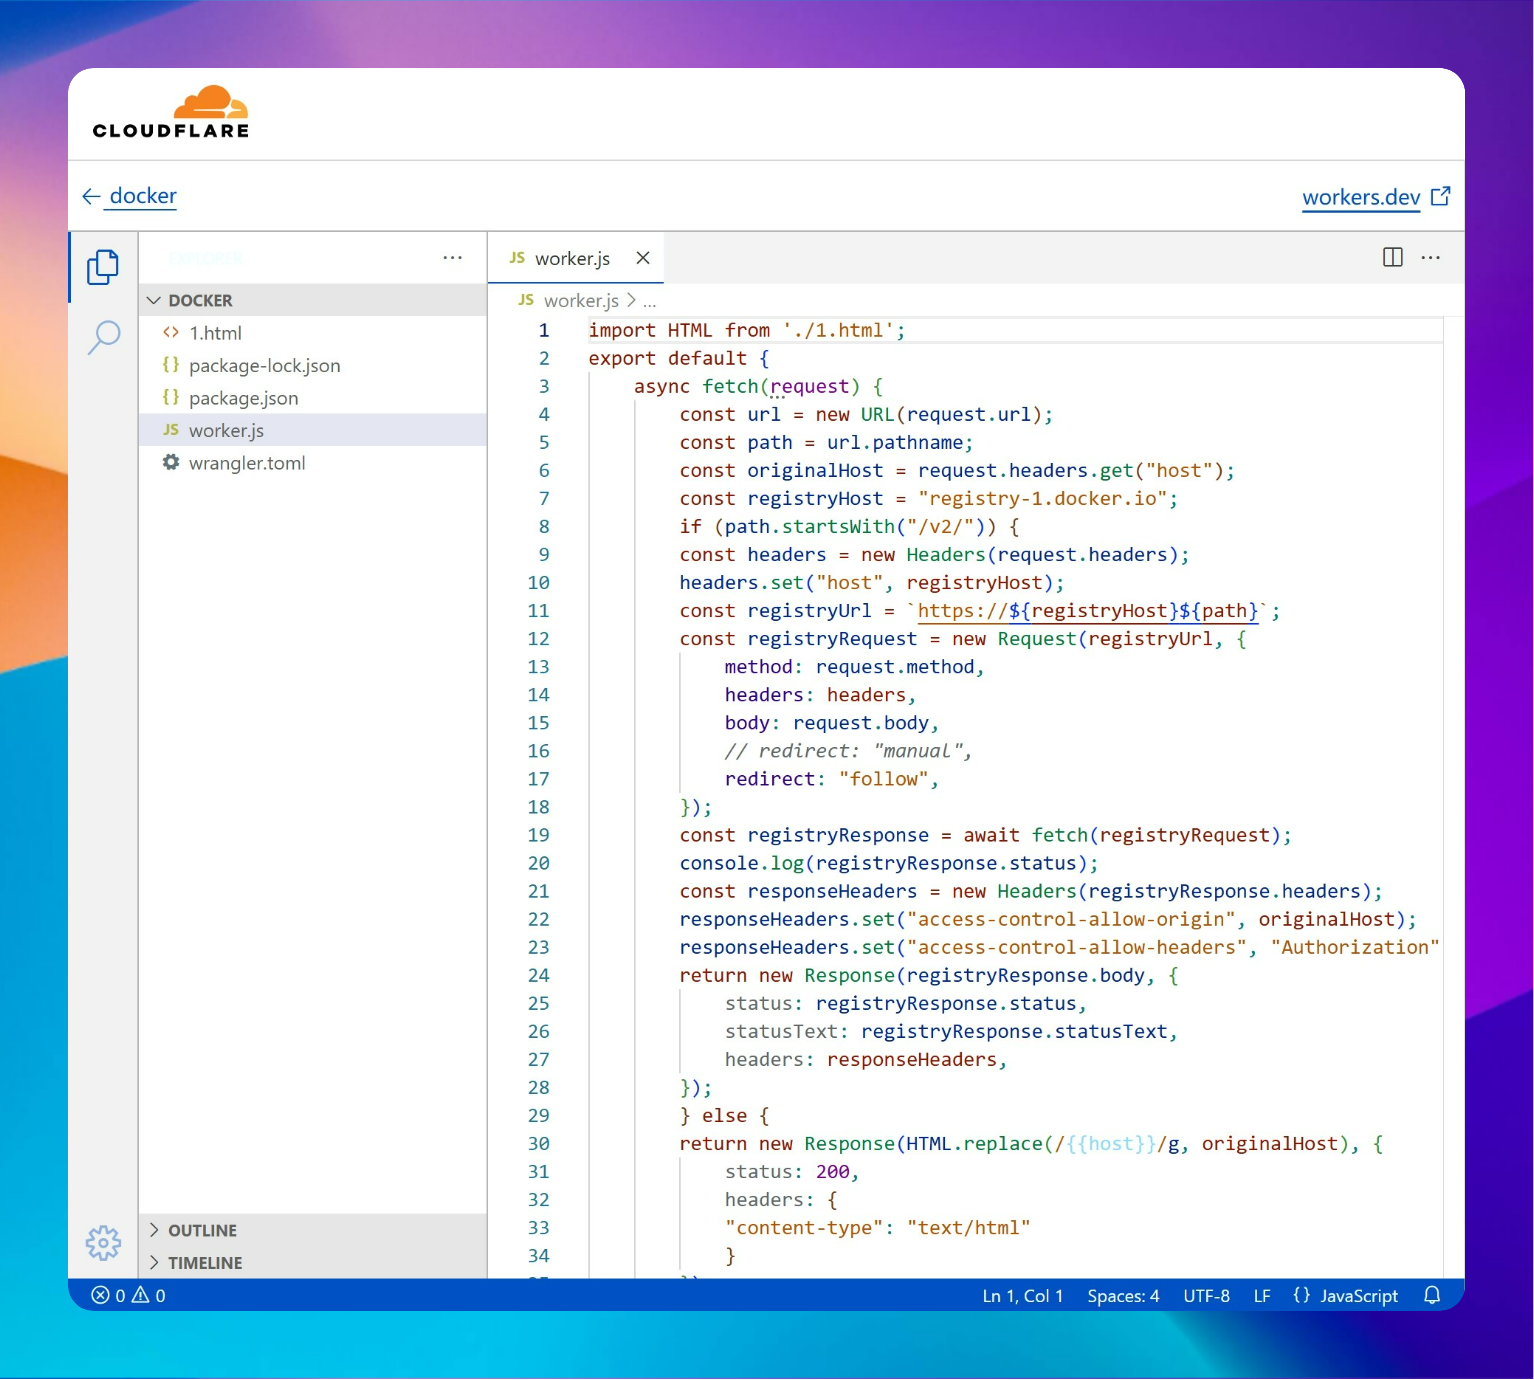
编辑 worker.js 文件
编辑覆盖后,Ctrl + S 即可保存。
import HTML from './1.html';
export default {
    async fetch(request) {
        const url = new URL(request.url);
        const path = url.pathname;
        const originalHost = request.headers.get("host");
        const registryHost = "registry-1.docker.io";
        if (path.startsWith("/v2/")) {
        const headers = new Headers(request.headers);
        headers.set("host", registryHost);
        const registryUrl = `https://${registryHost}${path}`;
        const registryRequest = new Request(registryUrl, {
            method: request.method,
            headers: headers,
            body: request.body,
            // redirect: "manual",
            redirect: "follow",
        });
        const registryResponse = await fetch(registryRequest);
        console.log(registryResponse.status);
        const responseHeaders = new Headers(registryResponse.headers);
        responseHeaders.set("access-control-allow-origin", originalHost);
        responseHeaders.set("access-control-allow-headers", "Authorization");
        return new Response(registryResponse.body, {
            status: registryResponse.status,
            statusText: registryResponse.statusText,
            headers: responseHeaders,
        });
        } else {
        return new Response(HTML.replace(/{{host}}/g, originalHost), {
            status: 200,
            headers: {
            "content-type": "text/html"
            }
        });
        }
    }
}
编辑 1.html 文件
<!DOCTYPE html>
<html lang="zh-CN">
<head>
<meta charset="utf-8">
<meta name="viewport" content="width=device-width, initial-scale=1">
<meta name="description" content="Docker镜像使用说明,包括如何设置registry mirror和手动拉取镜像">
<title>镜像使用说明</title>
<style>
:root {
--primary-color: #3498db;
--secondary-color: #2ecc71;
--background-color: #ecf0f1;
--text-color: #34495e;
--code-background: #2c3e50;
--code-text: #ecf0f1;
}
html, body {
height: 100%;
margin: 0;
padding: 0;
}
body {
font-family: Arial, sans-serif;
background-color: var(--background-color);
color: var(--text-color);
display: flex;
flex-direction: column;
}
header {
background: linear-gradient(135deg, var(--primary-color), var(--secondary-color));
color: #fff;
padding: 20px 0;
text-align: center;
}
main {
flex: 1 0 auto;
max-width: 800px;
width: 100%;
margin: 40px auto;
padding: 20px;
background-color: #fff;
box-shadow: 0 4px 8px rgba(0, 0, 0, 0.1);
border-radius: 10px;
box-sizing: border-box;
}
pre {
background-color: var(--code-background);
color: var(--code-text);
padding: 15px;
border-radius: 5px;
overflow-x: auto;
position: relative;
}
code {
font-family: monospace;
}
.copy-btn {
position: absolute;
top: 5px;
right: 5px;
background-color: var(--secondary-color);
border: none;
color: #fff;
padding: 5px 10px;
cursor: pointer;
border-radius: 3px;
}
footer {
flex-shrink: 0;
text-align: center;
padding: 20px 0;
background-color: var(--primary-color);
color: #fff;
}
.faq-question {
cursor: pointer;
font-weight: bold;
}
.faq-answer {
display: none;
margin-top: 10px;
padding-left: 20px;
}
@media (max-width: 600px) {
main {
margin: 20px auto;
padding: 15px;
}
}
</style>
</head>
<body>
<header>
<h1>镜像使用说明</h1>
</header>
<main>
<div class="content">
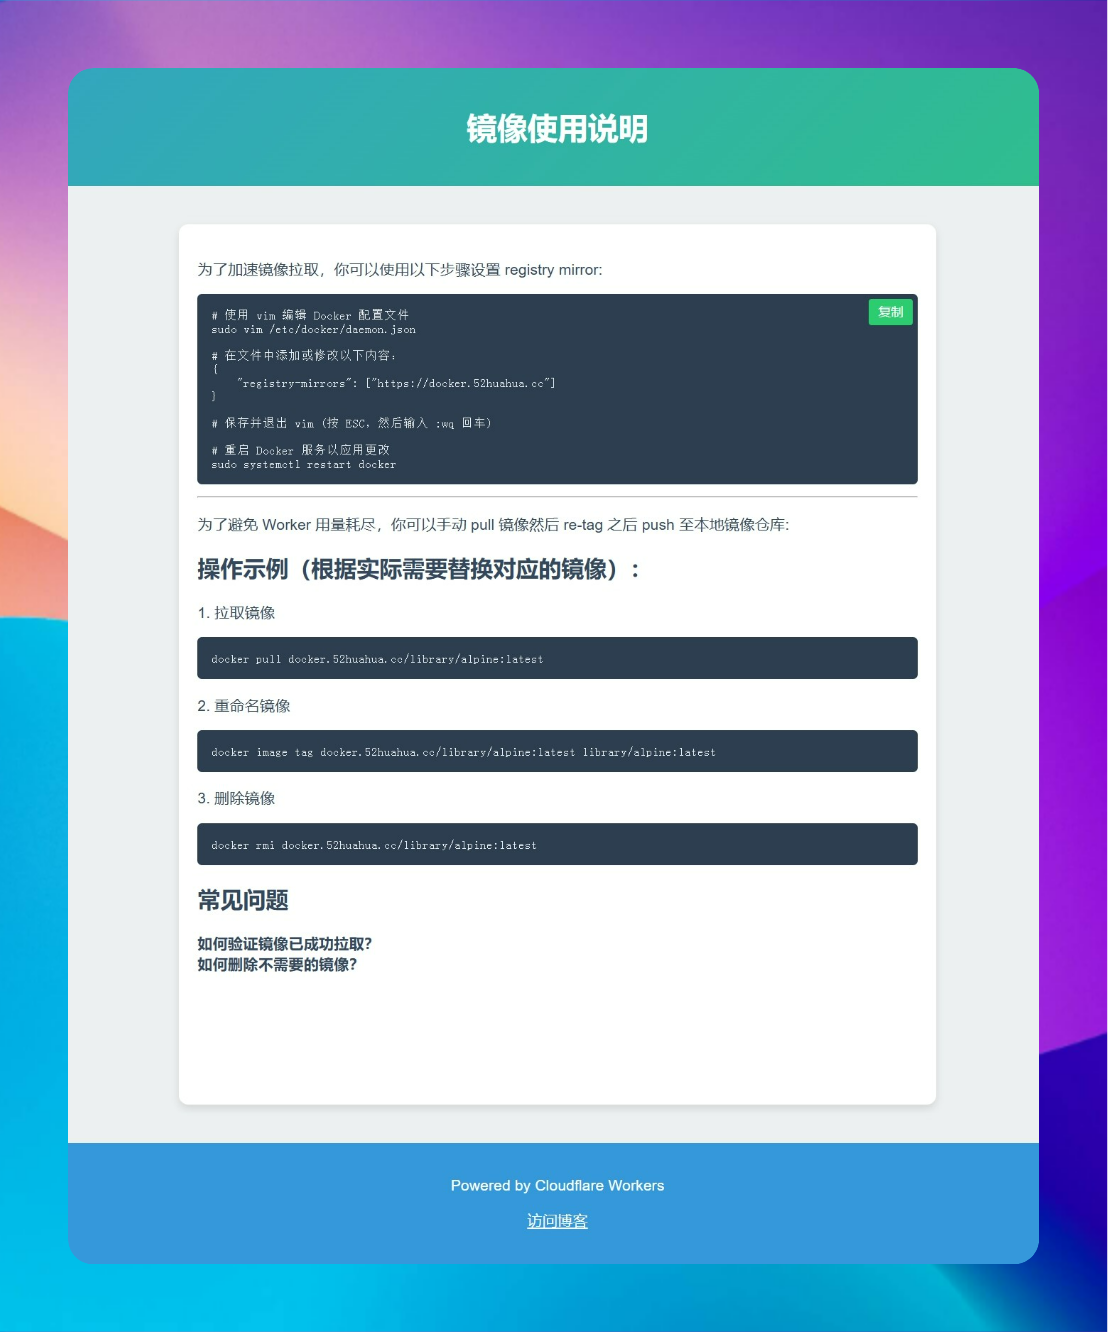
<p>为了加速镜像拉取,你可以使用以下步骤设置 registry mirror:</p>
<pre><code># 使用 vim 编辑 Docker 配置文件
sudo vim /etc/docker/daemon.json
# 在文件中添加或修改以下内容:
{
"registry-mirrors": ["https://{{host}}"]
}
# 保存并退出 vim (按 ESC,然后输入 :wq 回车)
# 重启 Docker 服务以应用更改
sudo systemctl restart docker</code><button class="copy-btn">复制</button></pre>
<hr />
<p>为了避免 Worker 用量耗尽,你可以手动 pull 镜像然后 re-tag 之后 push 至本地镜像仓库:</p>
<h2>操作示例(根据实际需要替换对应的镜像):</h2>
<p>1. 拉取镜像</p>
<pre><code>docker pull {{host}}/library/alpine:latest</code></pre>
<p>2. 重命名镜像</p>
<pre><code>docker image tag {{host}}/library/alpine:latest library/alpine:latest</code></pre>
<p>3. 删除镜像</p>
<pre><code>docker rmi {{host}}/library/alpine:latest</code></pre>
</div>
<div class="faq">
<h2>常见问题</h2>
<div class="faq-item">
<div class="faq-question">如何验证镜像已成功拉取?</div>
<div class="faq-answer">
你可以使用 <code>docker images</code> 命令来列出本地的所有镜像,确认新拉取的镜像是否在列表中。
</div>
</div>
<div class="faq-item">
<div class="faq-question">如何删除不需要的镜像?</div>
<div class="faq-answer">
使用 <code>docker rmi [镜像ID]</code> 命令可以删除指定的镜像。请注意,删除镜像前需要先停止并删除使用该镜像的所有容器。
</div>
</div>
</div>
</main>
<footer>
<p>Powered by Cloudflare Workers</p>
<p><a href="https://blog.52huahua.cn" target="_blank" style="color: #fff;">访问博客</a></p>
</footer>
<script>
document.addEventListener('DOMContentLoaded', function() {
// 复制代码功能
document.querySelectorAll('.copy-btn').forEach(btn => {
btn.addEventListener('click', function() {
const code = this.previousElementSibling.textContent;
navigator.clipboard.writeText(code).then(() => {
const originalText = this.textContent;
this.textContent = '已复制';
setTimeout(() => this.textContent = originalText, 2000);
});
});
});
// FAQ 折叠功能
document.querySelectorAll('.faq-question').forEach(question => {
question.addEventListener('click', function() {
const answer = this.nextElementSibling;
answer.style.display = answer.style.display === 'block' ? 'none' : 'block';
});
});
});
</script>
</body>
</html>保存部署并配置触发器
上述两个文件的代码保存后,选择部署 > 保存并部署
点击左上角的项目连接,配置触发器。(自定义域名访问)
自定义域名访问
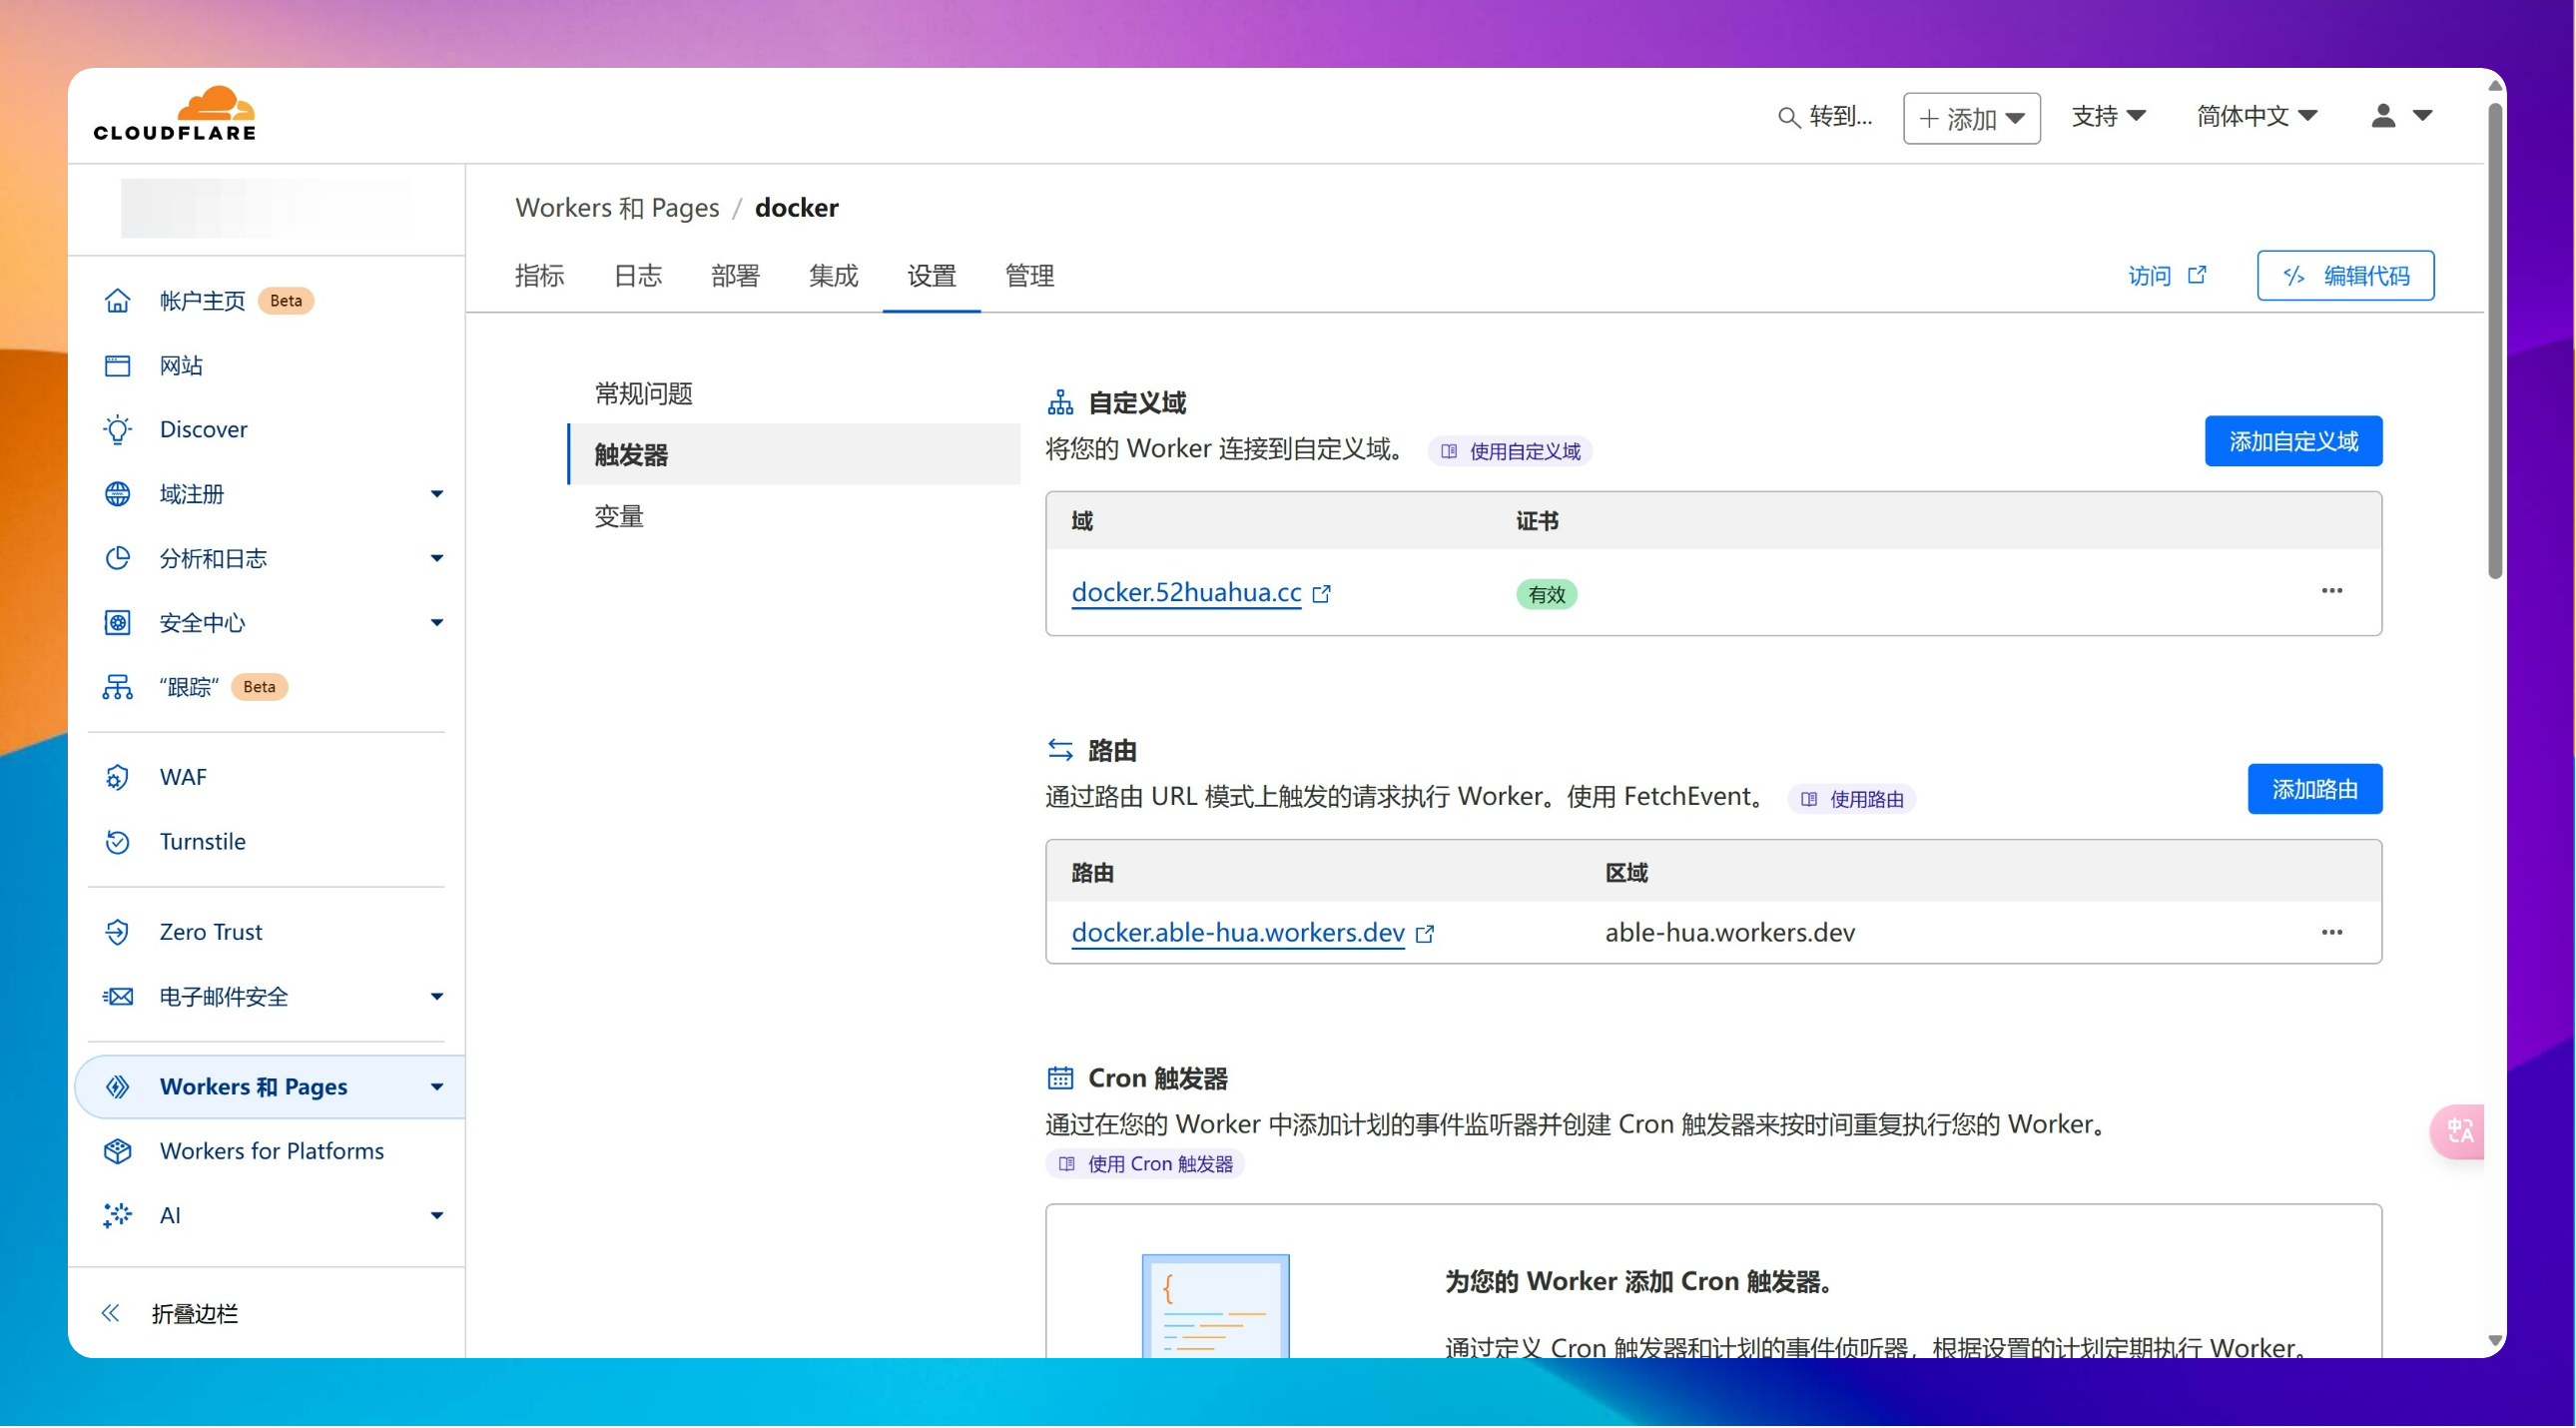
访问界面
参考来源
白嫖Cloudflare Workers 搭建 Docker Hub镜像加速服务 - Song`s Blog (songxwn.com)
- 222
-
分享